
Teaching with Limited Devices

Teaching with technology can be frustrating.
On one day, you show up to a computer lab with your class and all of the desktops have to run mandatory updates. Trying to avoid that problem in the future, you get their hands on an iPad cart after waiting another several days, but find out the devices don’t have the necessary apps pre-loaded. The next year, your district goes 1:1 (where students bring their own device or a school district provides it for them), but you soon encounter problems with students forgetting to bring their devices that day or charge them. The point is, using instructional technology isn’t as easy as the outside observer might make it out to be.
For some teachers though, getting each student online and connected isn’t the issue–in many instances, the devices themselves simply don’t exist in the first place.
I’ll use my home state as an example:
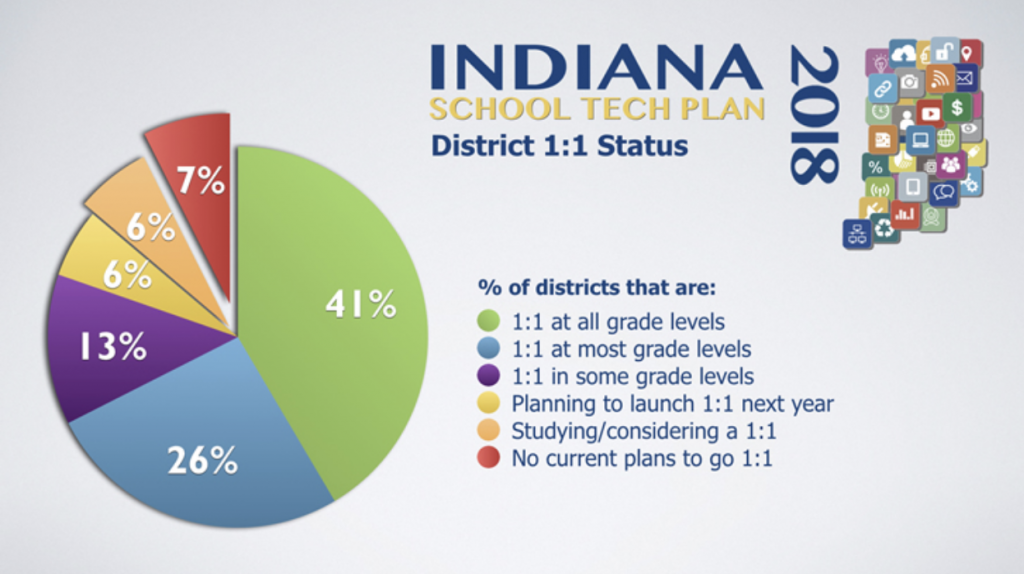
Going off of this data, only 41% of districts in Indiana have a device for all students K-12. That’s quite a lot of districts (59%) in which at least some students don’t have a Chromebook, iPad, etc., to call their own.
If you’re a Classtime educator who’ve found yourself in a similar spot– limited devices and lots of students–this is the vlog post for you. Let’s discuss some innovative, practical strategies to make those few devices stretch as far as possible.
My guess is you’ll likely be reading this post somewhere on this spectrum:

On the one hand, it’s understandably frustrating to not have enough devices for each of your students. My first teaching job as a Special Education teacher wasn’t 1:1, and it required a lot of patience and creative problem-solving. I’ve tried to impart some of my learning from that experience in the following sections.
If you’re reading this post from a point of confusion or wonder, that’s okay too. You’ll find lots of ideas and practical strategies you can implement in your classroom right away, no matter your Classtime expertise or subject area.
How To Start Using Classtime with Limited Devices

Before we get into any kind of specific scenarios, you’ll notice a couple of common “threads” between expert tech users who have limited devices in general (not necessarily just with Classtime):
1) Like all teachers, they “tailor” their use of technology to their lesson objectives, not vice-versa. If you’re not familiar with the theme of “technology is a tool, not a lesson plan” this is a big lesson a lot of early teachers learn the hard way. Although I think we can all agree that Classtime can do some AMAZING things, just remember that your objectives drive how you use tech, not the other way around.
2) Expert tech-limited teachers attempt to “tie up any loose ends” by critically thinking about their use of tech in the classroom. They try to be proactive problem-expecters instead of reactive problem-solvers. You’ll see some examples of what I mean as we get into more specifics.
The First Step: Establishing Expectations and Procedures
Once you’ve got a few devices in hand (see the epilogue for more information on smartphones, specifically), you need to create expectations and procedures in your classroom for using Classtime with them:
– When should smartphones or small devices be used?
– How will your class put them away / take them out? What procedures are part of these scenarios? How will you cue students? (Don’t forget to practice and remind them!)
– What do you do when students forget a device or their battery is dead?
– How will students share devices with their peers?
My own basic digital expectations and procedures look something like this:
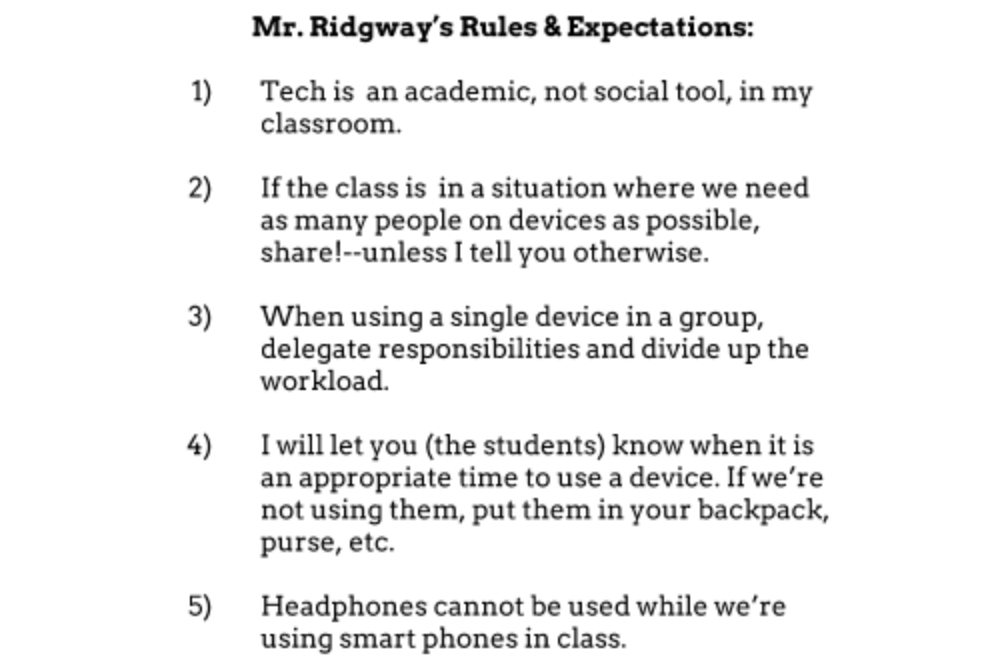
It could be tempting to go into extreme depth with rules, processes, & regulations, but don’t forget the most important part of a behavior management plan: a well-designed, engaging lesson. Students in my class often comment/complain that “we’re too busy to get distracted”. Engaging and dynamic lessons can solve a lot of tech-related problems even before they start.
A tip from Nate: If you let students use their own devices they’ve brought, check up on them periodically. It’s easy for them to get distracted while its very difficult for you to monitor what their screen is on! Make sure you set clear expectations with your students and rotate around the room frequently.
The Second Step: Play to Your Strengths & Weaknesses
Before you load up your first session or Collaborative Challenge from Classtime, get to know the strengths and weaknesses of the devices you have and design your lessons around them. It will make a remarkable difference in how much success you’ll have and how much frustration you’ll avoid.
For instance:
– If you know that your limited number of devices are tougher to type on, such as iPads or smartphones, try to ask questions that don’t require lots of input like multiple choice, multiple answer, and true/false.
– Touchscreen devices are an excellent way to play with the more “tangible” question types on Classtime, such as reorder and hotspot.
– If your own device that you use to display Classtime doesn’t have a lot of computer power or only gets a weak wi-fi signal, avoid more graphically intense elements such as picture-based questions or Collaborative Challenges. Don’t forget that if you personally don’t have a good in-class connection, Classtime sessions can be made in advance (when you’ve got a stronger connection, let’s say, at home), and students can complete them independently.
If you’re struggling to come up with your own lists of strengths and weaknesses, imagine yourself and your students going through the effort of a Classtime session. What would work well? What might need to be changed? What problems might unexpectedly arise?
Grouping Strategies
I’ve put together a series of 5 limited-device grouping strategies that can be used with Classtime. Again, don’t forget that grouping doesn’t drive your instruction; let the grouping make your Classtime-based lesson possible.
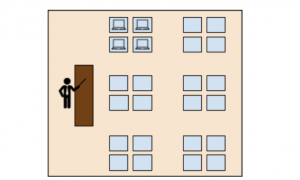
Strategy 1: A Device Per Group
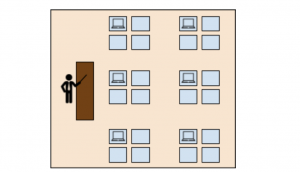
Purposes:
– All students participate in the same session.
– Differentiated groups participate in scaffolded sessions.
Likely Activities:
– Warmups, Exit Tickets, Whole-Group Lessons, Group Projects, Escape Rooms.
Recommendations:
– Differentiated groups can be done by student selected content, learning process, interest area, or readiness.
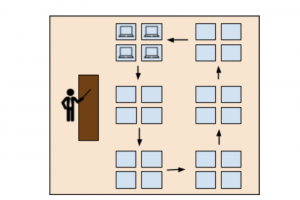
Strategy 2: A Device Per Rotating Group
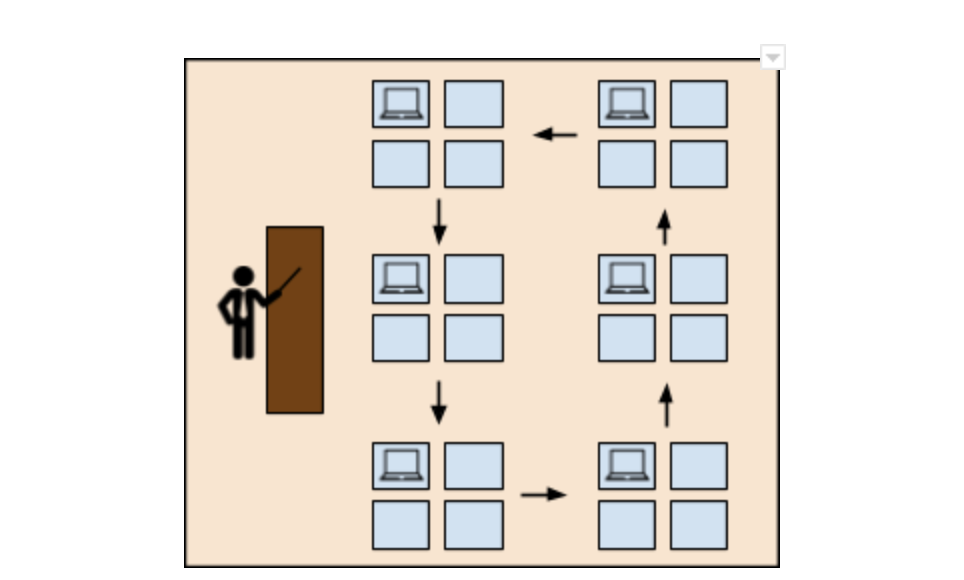
Purpose:
– Students rotate between activities and complete a Classtime assessment after each one.
Likely Activities:
– Activity Stations, Problem Trails, Gallery Walks, Escape Rooms.
Recommendations:
– Balance groups heterogeneously.
– Keep a timer running to keep groups moving along.
– Make sure that your stations aren’t linear–students should be able to start & end anywhere.
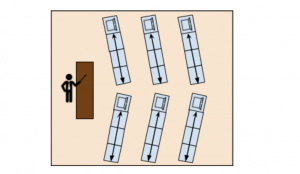
Strategy 3: Clustered Devices
Purpose:
– Collect one particular group’s assessment data. All students might take the same assessment, but one group will use Classtime.
Likely Activities:
– Warmups, Exit Tickets, Small Groups.
Recommendations:
– The particular students who will use Classtime could be self-selected by the students or chosen by the instructor.
Strategy 4: Classtime Station
Purposes:
– Use Classtime as an assessment check after a particular activity.
Likely Activities:
– Stations; not advised for linear-based activities (warmups & exit tickets).
Recommendations:
– Not an advised setup for linear activities (warmups & exit tickets).
– This gives the instructor an incremental “slow drip” of data that can be used to adjust instruction on the fly.
Strategy 5: “Hot Potato” Competition
Purposes:
– An assessment & gamification grouping strategy.
Likely Activities:
– Warmups, Exit Tickets, Review Activities, Attention-Grabbers
Recommendations:
– I’ve heard through the grapevine that Classtime is currently making a competitive version between small groups, which is super exciting! Having students “pass” the device (hence, “hot potato”) adds the ability for classrooms with limited devices to take advantage of this upcoming gamification update.
If you’re looking for more on how to use Classtime in some of the ways mentioned above, check out the following vlogs to get started. None of them require that every student has a device, either!
– Creating controversy with Classtime
– Digital Escape Rooms in your Classroom
The easiest way to learn more is to start a session of your own and take the tour. It takes less than three minute – it’s that simple!
Hopefully, this vlog gives you some ideas you can implement tomorrow in your classroom, despite only having a few devices on hand. And remember, these ideas are just a sample–develop your own groupings and uses as best suits your teaching style and setting.
 This is a guest post written by Nate Ridgway, a tech-loving history teacher in Indianapolis, Indiana. He specializes in lesson design and differentiation, and also is licensed in Special Education Mild Interventions. He’s taught in both middle school and high school settings, but currently is enjoying teaching World History & Dual Credit U.S. History. He currently is working on finishing a Masters degree in History at the University of Indianapolis and serves on Classtime’s Pedagogical Advisory Board.